The Sandpaper Letters
The Sandpaper Letters are one of Maria Montessori’s most beautiful material. A child will trace the letters which will not only support their letter recognition and sound but also gives a child the foundation for beautiful penmanship.
A child will learn how the sounds they hear are written using the Sandpaper Letters. They are the first concrete representation of a sound-symbol association. Montessori believed that writing comes first and then reading. The use of the Sandpaper Letters engage with a multi-sensory approach to learning as the child will use their visual, auditory, and tactile sense.
The Sandpaper Letters are a unique Montessori material and unlike other letter recognition tools available today. They must be carefully presented to the child and support must be given for the child to master how to trace the letters. This will help with the child’s muscle memory for the shape and direction of the letters, supporting their writing development.
To help prepare the child for Sandpaper Letters your environment needs to be rich in spoken language. Offering opportunities for the child to participate in listening games, such as ‘I spy’ is vital for preparing the ear so the child can distinguish the different sounds that make up words. A child will also need to have finger control for tracing. To gain finger control you can offer many practical life activities that support the development of hand-eye coordination of the child.
“Tracing the letter, in the fashion of writing, begins the muscular education which prepares for writing…Touching the letters and looking at them at the same time, fixes the image more quickly through the cooperation of the senses. Later the two facts separate; looking becomes reading; touching becomes writing.”
Maria Montessori (The Montessori Method)
What are they?
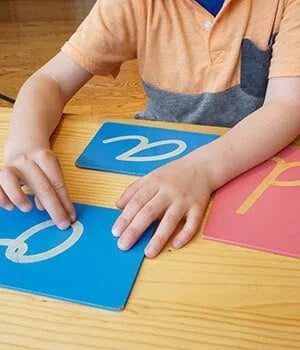
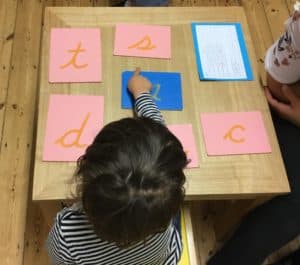
The Sandpaper letters are individual rough letters mounted on board that the child traces using their first two fingers. Vowels are typically mounted on blue, consonants on pink and two letter graphemes on green.
How do they work?
The Sandpaper letters are not introduced in alphabetical order. Many will follow the phonic phases for introduction but over the years I have found that including the first letter of the child’s name in their first introduction is helpful and the child gets excited to be learning how his/her name begins.

The letters are introduced with a Three Period Lesson, which is as follows:
1: This is …. (the letter sound, not name)
2: Show me …..
3: What is this? (pointing to the letter)
These three periods are not usually to be given in one presentation. You only move onto the next phase when you recognise the child is ready. For period 1, you will trace the letter first and say the sound (3 times) and then offer them to the child to trace and repeat the sound. This modelling is an important part of this lesson so don’t rush through it!
Period 2 can be offered in different ways, such as (but not limited to, get creative!):
- Can you hand me ….?
- Where is …..?
- Point to ….?
During this period is where you will be for the longest period. This is where you will assess the child’s comprehension and knowledge.
Period 3 is a quick-fire opportunity to double check their knowledge.
You can find both print and cursive Sandpaper Letters for children. I always start with cursive. Cursive allows freedom with the child’s hand as they move with the letters. Children make an easy transition from recognising the cursive letters to recognising print. If you start with print, the transition to cursive writing can be a challenge for some. The exception to this is if you are offering these at home and your child goes to a mainstream setting that offers print, you should stick to that at home for consistency.
It is important to remember that we are pronouncing the letter sound, not the name. I often hear wrong versions on the sound so it is important to familiarise yourself with the correct sound, e.g. \t\ not tuh or \m\ not muh!
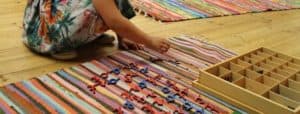
Moving on, when a child has had ample experience with the sound games and the Sandpaper Letters, they are ready to start to blend. This may happen naturally as the child grows in confidence. In a Montessori classroom, once a child knows approx. 12 sounds, I would move them onto the Moveable Alphabet (another post will be needed on this material!). The Moveable Alphabet is where that explosion into writing occurs. As mentioned previously, Maria Montessori discovered that introducing writing before reading is the most effective was for children to learn how to read. The Moveable Alphabet allows the child to sound out words and ‘write’ them using the wooden letters. Of course, we start with phonetic (CVC) words and slowly sound them out for the child to retrieve each wooden letter and place together. Once they have finished, I will support the child to read them back. Nothing beats the excitement on a child’s face when I tell them they have just read at this stage
!
I haven’t forgotten about the digraphs (two letter graphemes which represent one sound). These get introduced when I see a child is ready and is confident with single letter sounds of approx. 12 different sounds. Some will introduce these straight away and others when they know more. To truly follow the child, I avoid setting a rule to this and allow the child to lead me when they are ready. This hasn’t failed me yet!
Regardless of where your child is (nursery, home, Montessori, etc) the Sandpaper Letters can support your child with their writing and reading. The sensitive period for language is from birth until age 6 but that doesn’t mean you jump prematurely to the Sandpaper Letters. There is so much work to be done to prepare your child and as mentioned earlier, this is all about offering a language rich environment and opportunities to develop their hand strength.
Here are some ideas:
- READ, READ and READ!
- Read poetry
- Play rhyming games
- Play ‘I spy’ games
- Play listening games (what sounds do you hear outside!)
- Practical Life activities
- Art (paint, crayons, chalk, etc)
- Finger painting
- Playdoh
- Tonging
- Peg work
- Using a screwdriver
- Squeezing a sponge.
Happy Tracing!